
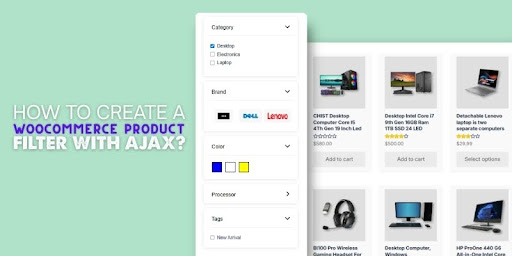
WooCommerce product filters with AJAX make online shopping feel faster, smoother, and more modern. Without needing to reload the page, products update instantly when someone clicks a filter like color, price, or category. If you’re trying to improve your store’s filter system, you might already be wondering how to create a WooCommerce product filter with AJAX?
Create WooCommerce Product filters with AJAX by installing the Dynamic AJAX Product Filters plugin. Use the WordPress dashboard, upload ZIP, or use FTP. Activate the plugin, then customize filters for real-time results without page reloads to boost user experience.
Want to know what makes this setup better for shoppers and easier for you? If you’re curious about mobile setup, styling, or fixing common issues, keep reading—this article shares all the steps and answers you’ll need in one place.
How to Create a WooCommerce Product Filter With AJAX?
If you install the right plugin, your product filters can show up automatically, especially with themes that support widgets or page builders. One of the best tools to make this happen smoothly is the Dynamic AJAX Product Filters for WooCommerce. This plugin allows real-time product filtering without any page reload, improving user experience and speeding up search results. Here are the steps for both free and PRO installations.
Option 1: Free Version (Install from WordPress Plugin Directory)
Dynamic AJAX Product Filters free version can be installed directly from the WordPress plugin directory. It requires no file upload or manual setup, just a few clicks from your dashboard. This is ideal for beginners and users looking for core filtering features without needing advanced customization.
Step 1: Log in to Your WordPress Admin Panel
Start by logging in to your WordPress site using your admin credentials. Make sure you have administrator access to perform plugin installations. Once logged in, you’ll land on the WordPress dashboard, where you control everything on your site. This is the central hub for installing, activating, and managing plugins. Without admin access, you won’t be able to complete the next steps.
Step 2: Go to the “Add New” Plugin Page
In the left-hand menu of your WordPress dashboard, hover over Plugins and click on Add New. This will take you to the plugin search screen, where you can browse or search for tools. You’ll see a search box at the top right and a list of featured and recommended plugins below. This section lets you quickly install plugins without leaving your site. It’s a fast way to expand your store’s features without touching any code.
Step 3: Search for “Dynamic AJAX Product Filters for WooCommerce”
In the top-right search field, type exactly: Dynamic AJAX Product Filters for WooCommerce. You’ll see a list of results—look for the one by WPify as the correct plugin. The plugin icon will show filter controls, and its name should match exactly. Double-check the author and name to avoid downloading a similar but incorrect plugin. Finding the right plugin here ensures you’re installing the one with proven performance.
Step 4: Click “Install Now” on the Correct Plugin
Once you find the correct plugin in the results, click the blue Install Now button next to it. The button will change to “Installing…” while WordPress downloads and prepares the plugin for activation. It usually takes just a few seconds, depending on your internet connection and server. After that, the install button changes to Activate, signaling the plugin is ready. This simple click installs all the core files needed for filtering to work.
Step 5: Activate the Plugin to Enable Filtering Features
Click the Activate button to turn on the plugin and make it functional on your site. Once activated, the plugin will automatically start working in compatible areas, such as sidebars or filter widgets. You’ll also find new settings under WooCommerce → Product Filters to manage behavior, design, and improve your WooCommerce product filter experience. Activation is essential because without it, the installed plugin won’t do anything. This final step connects the plugin to your WooCommerce store in real-time.
Option 2: PRO Version (Upload via WordPress Dashboard)
For users who purchased the PRO version, the installation requires uploading the plugin ZIP file directly through your dashboard. This method unlocks premium features such as advanced styling, multiple layouts, and extended filter types. It’s still beginner-friendly and doesn’t require FTP or coding knowledge.
Step 1: Open Dashboard
Start by logging in to your WordPress Admin Dashboard with an administrator account. Once inside, look at the left-hand menu and click on Plugins. A dropdown will appear—click on Add New to access the plugin installation area. At the top of the screen, you’ll see a button labeled Upload Plugin—this is what you need for PRO installations. Clicking it will bring up the file upload form needed to continue.
Step 2: Upload File
After selecting Upload Plugin, you’ll see a field with a Choose File button. Click this button and browse your computer to find the ZIP file you received after purchasing the PRO version. Don’t unzip the file—WordPress only accepts compressed ZIP files for uploads here. Once selected, you’ll see the file name next to the upload button, which confirms it’s attached and ready. Double-check that it’s the correct plugin before proceeding to the next step.
Step 3: Install Plugin
Now, click the Install Now button to begin the upload and installation process. WordPress will handle everything automatically and place the plugin files into your site’s plugin directory. This may take a few seconds, depending on the size of the plugin and your hosting speed. When it finishes, you’ll see a success message along with an option to activate the plugin. This step ensures the plugin is correctly installed and ready for use.
Step 4: Activate Plugin
Click Activate Plugin to enable the PRO version on your WooCommerce site. Once activated, the plugin will unlock advanced filtering features that weren’t available in the free version. These include custom layouts, additional filter types, and styling controls. You’ll now find a new settings panel under WooCommerce → Product Filters in your dashboard. Without this activation, your plugin will stay dormant and won’t affect your shop.
Step 5: Verify Features
Go to the Product Filters section inside your WooCommerce settings to confirm that PRO features are available. Look for enhancements like layout templates, filter logic control, dropdown styling, or swatches. If you see these options, your PRO version is active and working correctly. Some setups may also prompt you to enter your license key to receive updates and support. Once verified, you’re ready to start customizing your filters for a smoother shopping experience.
Option 3: Manual Installation Using FTP (For Advanced Users)
If you’re comfortable with FTP access, manual installation gives full control over plugin placement. This is useful if the dashboard upload fails or if you’re working on a staging site. This method involves downloading, extracting, and uploading the plugin folder via an FTP client like FileZilla.
Step 1: Download Plugin
Start by downloading the plugin ZIP file from the official WordPress plugin directory or your account if you’ve purchased the PRO version. You can find the free version at wordpress.org or access the premium version through your vendor login. Make sure to save the file to a location you can easily access on your computer. This ZIP file contains all the plugin files needed for installation. Don’t open or modify the file at this stage.
Step 2: Extract ZIP
Once downloaded, locate the ZIP file on your computer and right-click it. Select Extract All or use a ZIP extraction tool to unpack the contents. This will create a new folder—usually named dynamic-ajax-product-filters or something similar. The extracted folder contains all necessary plugin files and directory structure. Keep this folder open and ready for the next upload step.
Step 3: Open FTP Client
Now open an FTP client like FileZilla to connect to your website’s server. Enter your FTP credentials, which usually include the host address, username, password, and port number. If you don’t know these details, you can get them from your hosting provider. Once connected, you’ll see your local files on the left and server files on the right. You’ll use this interface to upload the plugin manually to your site.
Step 4: Upload Plugin Folder
In your FTP client, navigate to the directory /wp-content/plugins/ on the server side. Then go back to your extracted plugin folder on the local side and drag it into this /plugins/ folder. Wait for all files to fully transfer before proceeding. This step places the plugin directly into your WordPress plugin directory. Once uploaded, the plugin files will be stored on your site just like any auto-installed plugin.
Step 5: Activate Plugin
Return to your WordPress Admin Dashboard and go to Plugins → Installed Plugins. Scroll through the list to find Dynamic AJAX Product Filters in the plugin list. Click the Activate button to enable it on your WooCommerce site. Once activated, the plugin is ready to be configured from the settings panel under WooCommerce. You can now enjoy real-time AJAX product filtering without needing any extra setup.
Adding real-time filtering makes shopping faster and more enjoyable for your customers. A smooth setup helps improve product visibility and keeps visitors engaged longer. Whether you use a plugin or upload it manually, the result is a cleaner and more efficient store. Small upgrades like this can lead to a better user experience and more sales.
Why Use AJAX for WooCommerce Product Filters?
Every time you click something on an online store page, it takes a while for it to reload. That’s where AJAX filtering comes in. It helps make everything faster and smoother when people use filters. If you want to know how this works and why it’s helpful, keep reading.

Faster Browsing
AJAX filtering makes your store feel faster. When someone clicks on a filter like “Price” or “Color,” they don’t have to wait for the whole page to reload. Only the products update. This saves time and keeps the shopper’s focus on the items. They can see more options quickly, without delay. It feels like everything happens instantly, which makes shopping a lot more fun and easy.
No Page Reloads
One big reason people like AJAX filtering is that there are no full-page reloads. Normally, when someone clicks a filter, the site reloads, and it takes a few seconds. With AJAX, just the product list updates while the rest stays the same. This makes the site feel faster and cleaner. It also stops people from losing their spot or waiting too long, which helps them stay longer and shop more.
Smooth Experience
AJAX helps everything on your store feel smooth and easy. When filters work without reloading the page, it makes the whole shopping process better. People don’t get confused, and they don’t have to click the back button all the time. It also means less stress for shoppers because things work exactly as they expect. A simple, clean experience makes customers want to stay and browse more.
Mobile Friendly
AJAX filtering is great for phones and tablets. It keeps the site fast and easy to use on small screens. Without page reloads, users can filter items with just a few taps and keep scrolling smoothly. This is really helpful because many people shop from their phones now. A mobile-friendly filter helps your store look better and work better, no matter the screen size.
More Conversions
When your filters are quick and smooth, people are more likely to find what they want and make a purchase. AJAX filtering helps show the right products faster, which means less time searching and more time buying. The easier it is to shop, the better your chances of making a sale. A good filter system makes your store more helpful, and that brings in more happy customers.
Using AJAX for product filters makes shopping feel smoother and faster. It keeps the page from reloading, which saves time and avoids confusion. Customers can find what they want quickly and enjoy a better experience. Adding AJAX filters is a smart way to improve your online store.
How to Make AJAX Product Filters Mobile-Friendly in WooCommerce?
You need your store to be easy to use on small screens because more people are shopping on their phones. A clean, easy filter setup helps visitors stay longer and shop more. Want to learn how to make your AJAX filters mobile-friendly? Read on for simple and helpful tips.
- Use a slide-out panel for filters so the product page stays clean and shoppers can open filters only when they need them.
- Keep your layout in a single column on mobile so everything fits well and users don’t need to scroll side to side.
- Make sure filter buttons and links are big enough so users can tap them easily without zooming in or missing the right spot.
- Collapse all filters by default so they don’t take up too much space when the page first loads on smaller devices.
- Use clear icons or labels for the filter button so mobile users can quickly find and use it without getting lost.
- Avoid placing filters at the bottom of the page because users might not scroll down far enough to see or use them.
- Always test your filters on different mobile devices and screen sizes to catch any issues before real users face problems.
A mobile-friendly filter makes shopping easier and faster for everyone. It keeps users happy and helps your store work better on all devices. You don’t need complex tools—just smart changes. The better your filters work, the more your shoppers will enjoy the experience.
Common Issues With WooCommerce AJAX Filters and How to Fix Them
AJAX filters help people find products faster by updating the page without reloading. But sometimes things don’t go as planned, and the filters stop working properly. This can make the shopping experience confusing or frustrating. Knowing the common issues makes it easier to fix them quickly.
Common Issues with AJAX Filters
Before fixing anything, it helps to know what’s actually going wrong. These are some of the most common problems people face when AJAX filters don’t work the way they should.
- Filters Not Showing Up: Your filters may not appear if the plugin isn’t placed in a supported area, like a sidebar or widget zone.
- No Products Displayed: Sometimes, using the filter hides all products instead of showing filtered ones due to wrong settings or theme conflicts.
- Page Reloads on Filter Use: If AJAX isn’t working properly, using a filter may refresh the whole page instead of updating it smoothly.
- Filter Styling Looks Broken: The design of your filter might look odd if the plugin’s CSS clashes with your theme or custom styles.
- Filters Don’t Work with Elementor: If you’re using a page builder like Elementor, the filters may not respond if they aren’t added the correct way.
Fix These AJAX Filter Problems
Now that you know what the common issues are, let’s look at how to fix them. These steps are simple and can help your filters work better without needing extra tools or support.
Place Filters in the Right Spot
Make sure your filters are added in a widget-ready area such as the sidebar. If you’re using a page builder, use the shortcode or widget block designed for the plugin. Filters won’t show if they’re placed in an area that doesn’t support them. Some themes may hide the sidebar by default, so check your layout settings too. When filters are in the right spot, they should appear and work without any extra steps.
Double Check Filter Settings
Go into the plugin settings and make sure your filters are linked to the correct product attributes. Sometimes filters stop showing products because they’re not connected properly. You should also confirm that the logic type is set to “OR” or “AND”, depending on how you want filters to behave. This simple check can often solve the issue of products disappearing after a filter is used. Always save your changes and test after adjusting the settings.
Turn On AJAX Support
Some WooCommerce themes or plugins may not have AJAX enabled by default. Go into your theme settings or plugin panel and look for an AJAX option. Turning it on helps your filters work without reloading the page. If AJAX is already on and still not working, try disabling other plugins to check for conflicts. Keeping things simple often helps with tracking down what’s breaking the filter.
Tweak CSS for Better Design
If your filters look weird or messy, the problem could be a style clash. Use custom CSS to make sure filters match your theme without breaking the layout. You can also try switching themes temporarily to see if the design improves. Many filter plugins come with style settings, so tweak those before writing your own CSS. Keep testing after every small change to see what works best.
Use Elementor the Right Way
To make filters work with Elementor, use the plugin’s filter widget or shortcode instead of dragging in random widgets. Make sure the product grid and the filters are inside the same section or container. If they’re far apart or added separately, AJAX may not connect them. Refresh the page after adding filters to make sure they respond correctly. Check if your plugin version supports Elementor to avoid extra problems.
When filters break, don’t panic—it’s often an easy fix. Go step by step and check things like placement, settings, or conflicts. You’ll usually find the problem in one of those spots. Once fixed, AJAX filters make your store fast and simple to use.
Final Words
Setting up product filters that actually work well can make a big difference in how people shop on your WooCommerce store. Smooth filtering means quicker results and happier visitors. When filters are fast, clean, and easy to use, shoppers stick around longer and are more likely to buy something.
If you’re wondering how to create a WooCommerce product filter with AJAX, the answer is simpler than it sounds. All you need is the right plugin, like Dynamic AJAX Product Filters, and a few setup steps. Once installed and activated, the filter lets users search and sort products without reloading the page, making everything feel faster and easier.
Before you finish, always check your filter placement, settings, and compatibility with themes or builders like Elementor. Keep your layout clean, test on mobile, and update your plugin regularly. Hope this helps you build a better store—wishing you smooth filters and lots of happy customers!